Animating with requestAnimationFrame
Now that we know how to draw lots of cool things, lets animate them. The first thing to know about animation is that it's just drawing the same thing over and over again. When you call a draw function it is immediately put up on the screen. If you want to animate something, just wait a few milleseconds and draw it again. Now of course you don't want to sit in a busy loop since that would block the browser. Instead you should draw something then ask the browser to call you back in a few milliseconds. The easiest way to do this is with the JavaScript setInterval() function. It will call your drawing function every N msec.
However, we should never actually use setInterval. setInterval will always draw at the same speed, regardless of what kind of computer the user has, whatever else the user is doing, and whether or not the page is currently in the foreground. In short, it works but it isn't efficient. Instead we should use a newer API requestAnimationFrame.
requestAnimationFrame was created to make animation smooth and power efficient. You call it with a reference to your drawing function. At some time in the future the browser will call your drawing function when the browser is ready. This gives the browser complete control over drawing so it can lower the framerate when needed. It also can make the animation smoother by locking it to the 60 frames per second refresh rate of the screen. To make requestAnimationFrame a loop just call it recursively as the first thing.
requestAnimationFrame is becoming a standard but most browser only support their own prefixed version of it. For example, Chrome uses webkitRequestAnimationFrame and Mozilla supports mozRequestAnimationFrame. To fix this we will use Paul Irish's shim script. This just maps the different variations to a new function: requestAnimFrame.
// shim layer with setTimeout fallback
window.requestAnimFrame = (function(){
  return  window.requestAnimationFrame       ||
          window.webkitRequestAnimationFrame ||
          window.mozRequestAnimationFrame    ||
          window.oRequestAnimationFrame      ||
          window.msRequestAnimationFrame     ||
          function( callback ){
            window.setTimeout(callback, 1000 / 60);
          };
})();
Lets try a simple example where we animate a rectangle across the screen.
var x = 0;
function drawIt() {
    window.requestAnimFrame(drawIt);
    var canvas = document.getElementById('canvas');
    var c = canvas.getContext('2d');
    c.fillStyle = "red";
    c.fillRect(x,100,200,100);
    x+=5;
}
window.requestAnimFrame(drawIt);

interactive requestAnimFrame() example
basic animated rectangle using requestAnimFrame (click to run)
Clearing the background
Now you'll notice a problem. Our rectangle does go across the screen, updating by five pixels every 100 millesconds (or 10FPS), but the old rectangle is still there. It looks like the rectangle is just getting longer and longer. Remember that the canvas is just a pixel buffer. If you set some pixels they will stay there until you change them. So lets clear the canvas on each frame before we draw the rectangle.
var x = 0;
function drawIt() {
    window.requestAnimFrame(drawIt);
    var canvas = document.getElementById('canvas');
    var c = canvas.getContext('2d');
    c.clearRect(0,0,canvas.width,canvas.height);
    c.fillStyle = "red";
    c.fillRect(x,100,200,100);
    x+=5;
}

window.requestAnimFrame(drawIt);
interactive requestAnimFrame example
drawing rectangle with background clearing (click to run)
Particle Simulator
So that's really all there is to animation. Drawing something over and over again. Lets try something a bit more complicated: a particle simulator. We want to have some particles fall down the screen like snow. To do that we will implement the classic particle simulator algorithm:
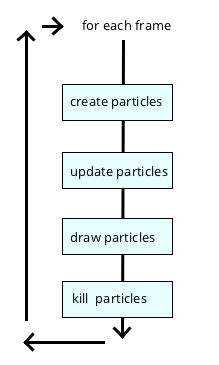
A particle simulator has a list of particles that it loops over. On every frame it updates the position of each particle based on some equation, then kills / creates particles as needed based on some condition. Then it draws the particles. Here's a simple snow example.
var canvas = document.getElementById('canvas');
var particles = [];
var tick = 0;
function loop() {
    window.requestAnimFrame(loop);
    createParticles();
    updateParticles();
    killParticles();
    drawParticles();
}
window.requestAnimFrame(loop);
First we will create the essence of a particle simulator. It's a loop function that is called every 30 ms. The only data structure we need is an empty array of particles and a clock tick counter. Every time through the loop it will execute the four parts.
function createParticles() {
    //check on every 10th tick check
    if(tick % 10 == 0) {
        //add particle if fewer than 100
        if(particles.length < 100) {
            particles.push({
                    x: Math.random()*canvas.width, //between 0 and canvas width
                    y: 0,
                    speed: 2+Math.random()*3, //between 2 and 5
                    radius: 5+Math.random()*5, //between 5 and 10
                    color: "white",
            });
        }
    }
}
The createParticles function will check if there are less than
100 particles. If so it will create a new particle. Notice that it only executes
every 10th tick. This lets the screen start off empty and slowly build up,
rather than creating all 100 particles right at the start. You would adjust this
depending on the effect you are going for. I'm using Math.random()
and some arithmetic to make sure the snow flakes are in different positions and
don't look the same. This will make the snow feel more natural.
function updateParticles() {
    for(var i in particles) {
        var part = particles[i];
        part.y += part.speed;
    }
}
The updateParticles function is very simple. It simply updates
the y coordinate of each particle by adding it's speed. This will move the snow
flake down the screen.
function killParticles() {
    for(var i in particles) {
        var part = particles[i];
        if(part.y > canvas.height) {
            part.y = 0;
        }
    }
}
Here is killParticles. It checks if the particle is below the
bottom of the canvas. In some simulators you would kill the particle and remove
it from the list. Since this app will show continuous snow instead we will
recycle the particle by setting the y back to 0
function drawParticles() {
    var c = canvas.getContext('2d');
    c.fillStyle = "black";
    c.fillRect(0,0,canvas.width,canvas.height);
    for(var i in particles) {
        var part = particles[i];
        c.beginPath();
        c.arc(part.x,part.y, part.radius, 0, Math.PI*2);
        c.closePath();
        c.fillStyle = part.color;
        c.fill();
    }
}
Finally we draw the particles. Again it's very simple: clear the background then draw a circle with the current particle's x, y, radius, and color.
Now here's what it looks like
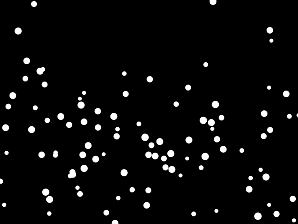
interactive Snow Simulator
Particle simulation of snow falling. (Click to run)
What I love about particle simulators is that you can create very complicated and organic, natural looking animation with very simple math, combined with a bit of carefully chosen randomness.
Sprite Animation
What is a Sprite?
The final major kind of animation is sprite animation. So what is a sprite?
A sprite is a small image that you can draw quickly to the screen. Usually a sprite is actually cut out of a larger image called a sprite sheet or master image. This sheet might contain multiple sprites of different things, like the different characters in a game. A sprite sheet might also contain the same character in different poses. This is what gives you different frames of animation. This is the classic flip-book style of animation: simply flip through different drawings over and over.
Why and When to use Sprites?
Sprites are good for a few of things.
- First, a sprite is an image so it will probably draw faster than vectors, especially if those are complicated vectors.
- Second, sprites are great for when you need to draw the same thing over and over. For example, in a space invaders kind of game you probably have a bunch of bullets on the screen that all look the same. It's very fast to load a bullet sprite once and draw it over and over.
- Third: sprites are fast to download and draw as part of a sheet. It lets you download a single image for your entire set of sprites, which will download much faster than getting a bunch of separate images. They typically also compress better. Finally, it uses less memory to have one large image than a bunch of smaller ones.
- Finally, sprites are great for working with animation that comes out of a drawing tool such as photoshop. the code simply flips between images but it doesn't care what is in the image. This means your artist could easily update the graphics and animation without touching the code. Just drop in a new sprite sheet and you are set.
Drawing Sprites
Sprites are easy to draw using the drawImage function. This function can draw and stretch a portion of an image by specifying different source and destination coordinates. For example, suppose we have this sprite sheet and we just want to draw the sprite in the center (5th from the left).
![]()
We can draw just this sprite by specifying source coordinates:
context.drawImage(
    img,        // the image of the sprite sheet
    65,0,13,13, // source coordinates      (x,y,w,h)
     0,0,13,13,  // destination coordinates (x,y,w,h)
    );
Sprite Animation
As you can see in the full sprite sheet, this is really the same object drawn in different frames of an animation, so now let's flip through the different sprites to make it be animated. We'll do this by keeping track of the current frame using a tick counter.
var frame = tick % 10;
var x = frame * 13;
context.drawImage(
    img,        // the image of the sprite sheet
    x,0,13,13, // source coordinates      (x,y,w,h)
    0,0,13,13,  // destination coordinates (x,y,w,h)
    );
tick++;
Every time the screen is updated we calculate the current frame animation by looking at the tick. Doing a mod (%) 10 operation means the frame will loop from 0 to 9 over and over. Then we calculate an x coordinate based on the frame number. Then draw the image and update the tick counter. Of course this might go too fast, so you could divide the tick by 2 or 3 before the mod to make it run slower.
interactive Sprite animation
animating through 10 frames, magnified for detail (click to run)
In the next chapter we will build a simple game. This game will demonstrate how to use basic and sprite animation, keyboard events, and a simple particle simulator for explosions.