ProcGen: Playing with Color
Welcome back to my series on procedural content generation. Today we are going to learn how to play with color. Generating textures is great, but it's so much better when we can generate new color schemes to go with our textures. First, however, we need to do a little clean up.
Cleanup
Through the Gradient post we are converting values from one range of values to another. ix is in the range of 0 to 1, but we want 0 to 2*Pi. The output of sin is -1 to 1, but we want to render 0 to 1. Instead of creating calculations for this each time, let's just create a function to remap a value from one domain to another.
function remap(value, start, end) {
    const t = (value-start[0])/(start[1]-start[0])
    return t * (end[1]-end[0]) + end[0]
}
The remap function can be used to convert ix to theta like this:
const theta = remap(ix, [0,1], [0,2*pi])and convert the output of sin like this
const v = remap(sin(theta),[-1,1], [0,1])Previously [link] we represented colors with little objects like this: {r:1, g:0, b:0}. While this works, it's problematic for a few reasons. First, objects are heavy when we create tons of them. Second, it's verbose. When we create lots of colors writing the little rs, gs, and bs over and over is going to get annoying. Third, it means algorithms which do the same thing to each color component need custom code. If each component should be treated the same then it should be possible to write generic algorithms that are more reliably and more compact.
So, in the interest of simplicity, we are going to represent colors as an array of three float values, in the range of 0 to 1. Thus red is [1,0,0], which is also far less typing. To use the new color structure we need to update some functions. The function lerpRGB can become lerpColors like this:
function lerpColors(t, arr) {
    //get the first color so we know it has 3 elements
    const first = arr[0]
    return first.map((c,comp) => {
        return lerps(t, arr.map(color=>color[comp]))
    })
}
Now lerpColors can handle a color with any number of components, and it can work with different color formats, which will be handy in a second.
Color Formats
What's a color format? Well, we traditionally think of color (at least on a computer) as represented by three components: red, green, and blue. This is in-fact how the computer thinks of color, but it's actually hard for humans to think of color in this way. Quick: if you have red how to you make it more yellow? It would be better if we had a way to specify color in terms that humans understand. There are many such color formats, and today we are using to use HSV for Hue, Saturation, and Value.
Hue represents the actual color part of the color, like red, yellow, purple, or green. Saturation means how pure is the color. Is this red just red or does it have some white mixed into it. A color with zero saturation would be completely white. Value means how bright is the color. A value of 1 would be the brightest possible color. A value of 0 would be completely black.
Of course the computer doesn't know how to render HSV, so we need to convert our HSV colors back and forth to RGB with these handy little functions.
//http://axonflux.com/handy-rgb-to-hsl-and-rgb-to-hsv-color-model-c
function HSVtoRGB(hsv) {
    /**
     * Converts an HSV color value to RGB. Conversion formula
     * adapted from http://en.wikipedia.org/wiki/HSV_color_space.
     * Assumes h, s, and v are contained in the set [0, 1] and
     * returns r, g, and b in the set [0, 1].
     *
     * @param   Number  h       The hue
     * @param   Number  s       The saturation
     * @param   Number  v       The value
     * @return  Array           The RGB representation
     */
    let h = hsv[0];
    let s = hsv[1];
    let v = hsv[2];
        var r, g, b;
        var i = Math.floor(h * 6);
        var f = h * 6 - i;
        var p = v * (1 - s);
        var q = v * (1 - f * s);
        var t = v * (1 - (1 - f) * s);
        switch(i % 6){
            case 0: r = v, g = t, b = p; break;
            case 1: r = q, g = v, b = p; break;
            case 2: r = p, g = v, b = t; break;
            case 3: r = p, g = q, b = v; break;
            case 4: r = t, g = p, b = v; break;
            case 5: r = v, g = p, b = q; break;
        }
        return [r,g,b]
}
// http://axonflux.com/handy-rgb-to-hsl-and-rgb-to-hsv-color-model-c
function RGBtoHSV(rgb) {
/**
* Converts an RGB color value to HSV. Conversion formula
* adapted from http://en.wikipedia.org/wiki/HSV_color_space.
* Assumes r, g, and b are contained in the set [0, 255] and
* returns h, s, and v in the set [0, 1].
*
* @param Number r The red color value
* @param Number g The green color value
* @param Number b The blue color value
* @return Array The HSV representation
*/
//function rgbToHsv(r, g, b){
let r = rgb.r
let g = rgb.g
let b = rgb.b;
var max = Math.max(r, g, b), min = Math.min(r, g, b);
var h, s, v = max;
var d = max - min;
s = max == 0 ? 0 : d / max;
if(max == min){
h = 0; // achromatic
} else {
switch(max){
case r: h = (g - b) / d + (g < b ? 6 : 0); break;
case g: h = (b - r) / d + 2; break;
case b: h = (r - g) / d + 4; break;
}
h /= 6;
}
return {h:h, s:s, v:v}
}HSV its not actually the best color format from a human perspective, but it's simple and easy to work with and most software supports it (CSS, for example).
Working in HSV
Okay, lets draw some colors. Instead of interpolating between them lets just draw them in a set of vertical stripes. We can easily do this by creating an array of colors and choosing the right one for a particular ix.
const floor = Math.floor
save(map(gen(200,200), (cur,px,py,ix,iy) => {
    const c1 = [0,1,1] // first color is light blue
    const c2 = [c1[0],c1[1]/2,c1[2]/2] //reduce green and blue parts by half
    const band = [c1,c2]
    return band1[floor(ix*band1.length)]
}), 'v4_1.png')
Which gives us this:

Since it's common to want to make a color darker, let's create a function to reduce the value of a color by 0.1 then draw a series of reds that get darker with each step.
function darker(hsv) {
    return [hsv[0], hsv[1], hsv[2]-0.1]
}
save(map(gen(200,200), (cur,px,py,ix,iy) => {
const colors = []
let color = [0,1,1]
colors.push(color)
for(let n=0; n<10; n++) {
color = darker(color)
colors.push(color)
}
const band = colors.map(c => HSVtoRGB(c))
return band[floor(ix*band.length)]
}), 'v4_2.png')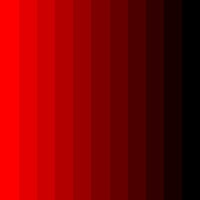
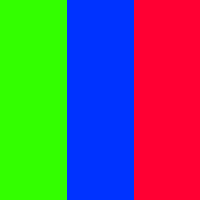
Complimentary Colors
Now that we can manpiulate colors, let's talk about how to make sets of colors that look nice together. These are called color schemes. A common way to pair a color with another one is to look for a color's compliment. A complementary color is on the opposite side of the color wheel from the base color. To calculate the compliment add 180 degrees to the hue, or 0.5 since our hue is in the range of 0 to 1 and wraps around.
This function will calculate the compliment of the supplied color.
function complimentary(hsv) {
    return [hsv[0]+0.5,hsv[1],hsv[2]]
}
Here are three colors paired with their compliments.


A triadic color set is when you start with a base color then calculate two other colors that are exactly 1/3rd of the way around the color wheel.
function triadic(base) {
    return [
        [base[0]+0.000,base[1],base[2]],
        [base[0]+1/3,base[1],base[2]],
        [base[0]+2/3,base[1],base[2]],
    ]
}
Here's an example of a triadic color scheme.
As you've probably noticed by now, complimentary and triadic colors produce schemes with very high contrast. Because the colors are far away from eachother in terms of hue they look very different. Analagous colors are different. They choose colors which are very close in hue, in this case (below) only one twelfth of the way around the color wheel.
function analagous(base) {
    return [
        [base[0]+0.000,base[1],base[2]],
        [base[0]+1/12,base[1],base[2]],
        [base[0]-1/12+1,base[1],base[2]],
    ]
}
The color green with it's two analagous colors looks like this:

Hmm. Some of the colors look nearly identical. That's because we only adjusted the hue a tiny bit. Instead of icnreasing the hue difference, let's change the brightness instead using the darker function.
save(map(gen(200,200), (cur,px,py,ix,iy) => {
    const colors = analagous([0.3,1,1])
    colors[1] = darker(colors[1])
    colors[2] = darker(colors[2])
    const band = colors.map(c => HSVtoRGB(c))
    return band[floor(ix*band.length)]
}), 'v4_4c.png')
Ah. Much nicer. By controlling the hue, saturation, and value carefully we can construct lots of interesting colors. Now let's take what we've learned and start producing color sets with some randomness.
Random Color Schemes
Since we are constantly adjusting a color by modifying particular slots in it's array, let's just create a generic add function which adds offsets to the color.
function add(c1, c2) {
    return [c1[0]+c2[0], c1[1]+c2[1], c1[2]+c2[2]]
}
Let's also create a function called wrap to handle cases where a generated color component is outside the range of 0 to 1. In this case, rather than clamping we will reverse the offset to move the component back into range. For example. 1.3 should be mapped to 0.3 less than 1, or 0.7. And -0.3 should be mapped back to +0.3.
function wrap(v) {
    if(v <0) return -v
    if(v >1) return 2-v
    return v
}
Okay. Now let's generate a series of colors. We'll start with a base then at each step add 0.02 to the hue
function generateRandomGradient(count) {
    const random = Math.random
    const colors = []
    let color = [0.3,0.5,1]
    for(let i=0; i<20; i++) {
        //rotate the hue by 0.05
        color = add(color,[0.02,0,0])
        //adjust the staturation by a random amount
        color = add(color,[0,+random(),+random()/2])

        //flip it if outside the range
        color[1] = wrap(color[1])
        color[2] = wrap(color[2])
        colors.push(color)
    }
    const band = colors.map(c => HSVtoRGB(c))
    save(map(gen(200,200), (cur,px,py,ix,iy) => {
        return band[floor(ix*band.length)]
    }), `v4_5_${count}.png`)
}
Which produces

Of course, this uses random numbers. Let's run it a few times and see what we get.


Pretty sweet! That's it for today. Next time we'll take a look at shapes.